Adventures in Baking: Extreme Baking Edition No 1
Chocolate Layer Cake
Birthdays are a fun time in every family, especially because of the beautifully decorated desserts. This year for my father’s birthday, my sister and I decided to make him a chocolate layer cake, a project utilizing multiple recipes and spanning over two days.
First, we selected our chocolate cake recipe from Little Flower Baking, a new cookbook I’d recently given to my sister. The amount of ingredients in this recipe was ginormous; I whipped together 4 cups of granulated sugar, 2 cups of butter, and 4 large eggs just to start. This pretty much filled my stand mixer. Next I brewed 2 ½ cups of coffee and mixed it in with two cups of sour cream. I learned partway through that I’d chosen way too small of a bowl and had to transfer to a larger one, which conveniently combined the two ingredients together perfectly. Finally, I mixed together the dry ingredients, among which were 5 ½ cups of flour and 2 cups of cocoa powder, along with quite a lot of leavening ingredients such as baking powder and baking soda. Now that I’d assembled all my ingredients, we had to mix them together. There was no normal bowl that would fit all of these ingredients, so we cleaned out our watermelon-painted Keurig-cup holder and in went the sugar mixture. After we’d set up, we alternately added the dry and the wet bowls, mixing all of the dough by hand.
Next, we divided the dough equally between two 9-inch cake pans and baked for 20 minutes at 350℉ before switching the pans’ places in the ovens and baking for another 20 minutes. We had to keep taking out the pans and checking to see if the cakes were baked all the way through for an extra 15 minutes of baking time, perhaps because the recipe’s baking time was off or because our oven ran low temperature-wise. Finally, the cakes were done and we refrigerated them overnight. While the cakes had been baking, we’d made the chocolate buttercream and the fudge layer, so we refrigerated those as well.
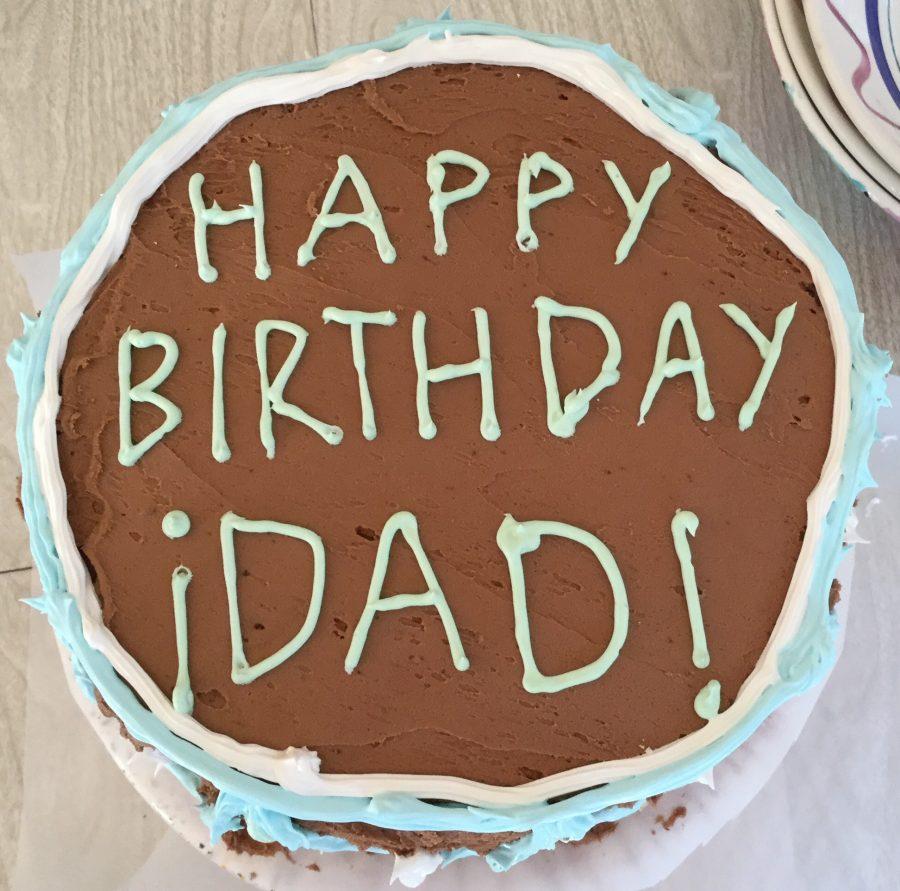
The next day, we took the cakes out of the refrigerator and trimmed off the tops. Then we measured the cakes’ heights and scored them before slicing each cake in half to create four layers. After defrosting the fudge and buttercream frostings by microwaving them for a short period, we placed the base of the cake on the cake-stand. Next, we spread a third of the fudge layer on top of the base. Handling the second layer carefully, we flipped it over on top of the base. We continued spreading the fudge and adding cake layers until we had finished assembling the cake. Now, we just had to frost it with the buttercream and decorative frosting. However, this was a harder task than it sounds because we realized we would run out of buttercream after frosting only the top and half of the sides. While my sister continued to frost the cake, I made a second batch of buttercream, which was slightly lighter in color than the first batch due to different amounts of chocolate. Hence, we finished the frosting job with a two-toned cake.
Then my sister made the royal icing, which we tinted green, blue, and white, and placed it into the frosting bags. Finally, I finished decorating the cake by frosting dots, arcs, and the words “Happy Birthday Dad” onto its top and sides.
This cake was a real challenge to make, but it tasted delicious once we’d finished with it. The cake was a dark, rich chocolate, and combined with the fudge layers and the sweet, thick buttercream, the flavors were wonderful complements. We declared our first layer cake a success!

Ellie is The Glen Bard's Editor-in-Chief and a senior at Glenbard West. This year is her third on the Editorial Board. She plays field hockey and chess,...